In a nutshell, this is how I produce my digital artwork:
- For every image I make, I start by drawing a traditional sketch. There isn't anything special here- I draw with mechanical pencils on Canson sketchbook paper. There is no need for a lot of clarity, or inking the image- as long as I can see the intent of the lines, I can interpret them correctly as I create digital lineart over top of the sketched image.
- Once the sketch is done, I scan the image into the program I use for digital art (in my case, Paint Shop Pro 7).
- After scanning, I draw lineart over the sketch in separate layers.
- Once the lineart is done, I fill in the lineart with flat colors.
- I finish the image by shading the character, adding effects, and making a background (for this step, I use Paint Shop Pro 9).
The following sections show my tool/palette/preference setups for Paint Shop Pro 7 (which can generally be applied to PSP9 as well) as well as a scanner how-to. Other programs like Photoshop won't look exactly like this, but will most likely have similar functions. In these tutorials I try to write broadly enough so it can apply to other programs, as PSP7&9 are extremely outdated.

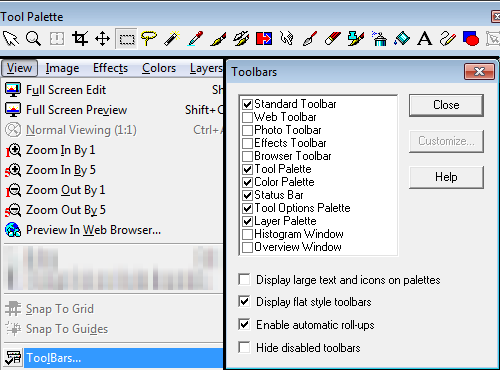
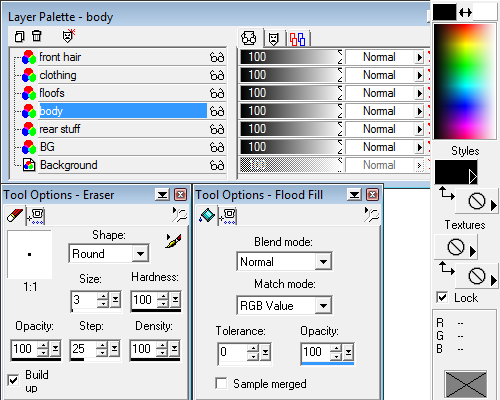
Click here to see how my PSP7 is arranged, which is a bit more minimalistic than the stock arrangement. Toolbars can be turned on or off by clicking the View tab, then "Toolbars..." at the bottom. The toolbars you'll want checkmarked are the Standard Toolbar, Tool Palette, Color Palette, Status Bar, Tool Options Palette, and Layer Palette. I also customized my Standard Toolbar to consist of my commonly-used functions, which can be done by right-clicking the toolbar and clicking "customize". I have the Standard Toolbar, Tool Palette, and Color Palette "bound" to the sides of the program. The Tool Options and Layer palettes I have hovering in the lower corners and are set to hide automatically when not active. The major tools I use with Paint Shop Pro are found in any program capable of digital art (even MS Paint!) and are listed below. For the Paintbrush, Flood Fill, and Eyedropper, left-clicking will apply the foreground (primary) color, and right-clicking will apply the background (secondary) color:
- Paintbrush: Applies the current shade to the current layer.
- Eraser: Removes details from the current layer.
- Retouch: Applies effects to active parts of the current layer.
- Draw (Line) Tool: Creates raster/vector lines and curves.
- Flood Fill: Fills in the chosen area with the current shade.
- Eyedropper: Changes the current shade to the color selected.
- Selection Tool: Creates predefined selection shapes (rectangles, ovals, etc).
- Lasso Tool: Creates freehand and irregular selection shapes.
- Magic Wand: Works like the Flood Fill, but instead creates a selection based on the given parameters when an area is chosen.

These palettes will allow you to manipulate the tools being used, as well as the image's layers. There are three "main" palettes:
- The Tool Options Palette allows users to manipulate settings for the active tool. Common settings include:
- Size: the size/width of the tool used (in pixels)
- Opacity: the transparency of the tool used (generally 0-100, 100 having no transparency)
- Hardness: the sharpness of a brush stroke's edges (generally 0-100, 100 being completely sharp)
- Density: how "solid" a brush stroke is (generally 0-100, 100 being completely dense)
- Step: the spacing between brush strokes (1 meaing it will apply the next stroke immediately after the previous one)
- Tolerance: the threshold of variability a tool has when selecting an area (0 meaning it will only affect exact matches based on the chosen criteria)
- Anti-alias: when active, it will slightly blur the edges of the tool to make it look smoother.
- The Color Palette allows users to manipulate the primary (foreground) and secondary (background) colors.
- Primary (Foreground) color: The color applied for left-clicking certain tools and outside borders of shapes, text, and lines. Clicking the arrow located in the corner of the selection boxes toggles whether a color, gradient, or texture is applied (or nothing at all).
- Secondary (Background) color: The color applied for right-clicking certain tools and the insides of shapes, text, and curved lines. Clicking the arrow located in the corner of the selection boxes toggles whether a color, gradient, or texture is applied (or nothing at all).
- Texture: Can be activated to cause the primary (or secondary) color to behave as the selected texture.
- The Layer Palette allows users to toggle different layers. It also allows users to control which layers are visible, how transparent each layer is, the layer's effect, and other things.

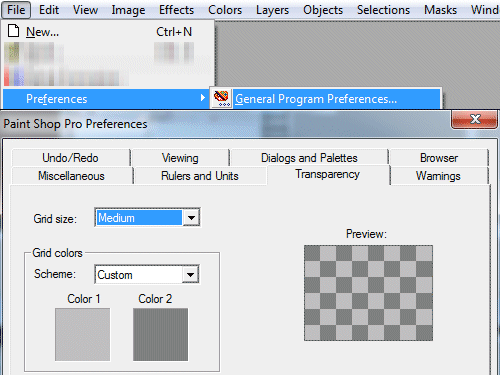
For PSP7 users, there are a couple other things you may want to change to make the program a little easier to use. Go under File, then go to Preferences, then click "General Program Preferences". There are two tabs where you may want to alter the settings. The first tab is under the Undo/Redo tab, where you probably want to increase the amount of Undo data the program can store (or you can make it unlimited, which is what I did). The other tab to look at is the Transparency tab, as I've found it's a lot easier to work on the lineart when white is not one of the background grid colors. This checkerboard grid is visible in place of transparent portions of an image (or layer). I'd suggest changing the white color of Color 1 to a darker grey than Color 2. Also, under Preferences, you may want to activate the Autosave function, although I do not have this turned on.

To set the foundation of the image, the sketch needs to be scanned. To do this:
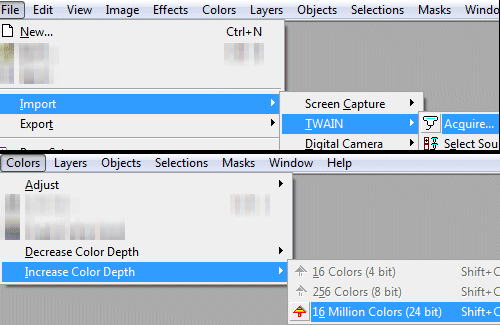
- Open the scanner's dialogue window in your digital art program (PSP users, click: File > Import > TWAIN* > Acquire).
- Change the scanner's options to scan in greyscale with a resolution of 400DPI (Dots Per Inch). All scanners are different, so I can't really say -how- to put in these options, but basically any scanner supports this. You may have to toggle an "Advanced mode" to get to these options. I scan images using greyscale because it is much faster than a color scan and having the sketch in greyscale doesn't impact the lineart phase at all (if it's just a pencil sketch, of course). Although 300DPI is standard for prints, I prefer working with a larger canvas/resolution.
- Close the scanner's dialogue window to end the session.
- Increase the color depth to 16 million colors (PSP: click Colors > Increase Color Depth > 16 million colors).
- Create a new Raster Layer [PSP: click Layers > New Raster Layer (name the layer if you want, then click OK)]. More info about layers will be covered in the Layers tutorial.